[ Content | Sidebar ]

To Filter or Not to Filter?

June 27th, 2008

A few filters

That is the question. My ebay shopping sprees have landed me a few accessories that sometimes came with the lenses I purchased. UV filters, Sky 1A warming filters, and a couple of close-up filters. I never gave these filters much thought at all. So when the time came to decide whether they are beneficial or not, I hit the web for answers. Which led me to this highly controversial question.

Sky 1A filters are generally used in film to warm up the image. This was typically used on portraits where a warmer skin tone tends to look more pleasing. On digital, this can be achieved with white balance, so having that filter there is pretty useless. Close-up filters are the poor-man’s macro. I got a set of Vivitar No. 1, No. 2 and No. 4 close-up filters, which offers different degrees of magnification. Since I have a dedicated macro lens (which definitely has better performance), I’ve never used these filters either.

The controversy lies in UV filters. Back in film days, UV filters were used to absorb ultraviolet light that could affect the exposure. On digital, this is not an issue at all, and the only purpose it serves now is to protect the front element of the lens. But is it effective and is it worth it?

The pro-UV camp has numerous ancedotal evidence of how that UV filter saved the lens from fatal accidents. The idea is that it’s better to shatter the $50 UV filter than to shatter the glass on that $1000+ lens.

On the flip side, the anti-UV camp is arguing that if you do have a $1000+ lens, why would you want to put an inferior $50 glass over it? This will certainty lead to a loss of image quality. Cheaper single coated filters especially, can sometimes cause unwanted and strange reflections in the image. The argument also goes on to say that a lens hood provides much better protection from falls and accidents.

Personally, when I first started out, I was all set to buy UV filters for all my lenses. They were my babies and I wanted to protect them. I use a hood all the time, but I still wanted that extra layer of protection. But now that I tend to shoot with manual lenses only, I hardly use them anymore. My lenses cost about $30-$40 on average, so buying a $30 filter to protect my $30 lens just didn’t make economical sense. If my lens got damaged, I can take that money I saved from not buying a filter to just buy another lens. That’s a nice benefit of shooting manual focus.

And apparently, there are a lot of clumsy people who often drop their lenses. I’ve never had any accidents of dropping my lenses on the ground (knock on wood). I always change lenses close to my bag, and never leave lenses unattended or anywhere in danger of falling. Like I said, they’re my babies.

So for me, the answer is easy. I don’t have any expensive equipment to protect, and with some of my pre-AI single coated glass, I need all the image quality I can get. At least this will be one accessory I don’t need in this expensive hobby.

Spray N’ Pray

June 16th, 2008

Cowabunga!

With ever advancing autofocus technology out there, a whole new string of buzzwords have come about: single servo, group dynamic, 3-D motion tracking, etc. However you want to call it, it’s job is to help you get your subject in focus and keep it there using a number of sensor points, ranging from 3 (boo on Nikon D40) to 51 (yay for Nikon D300, D3). With autofocus doing all the work, it’s hard to believe there was a time where people had to manually focus. Especially with sports, where every split second counts. I got a taste of that this past weekend, and it was definitely fun.

It was a beautiful Sunday afternoon, so we rented a pedal-boat from Shoreline Park in Mountain View, CA. I was a bit hesitant to bring my D40 and a 50mm f/2.0 Pre-AI lens — I had an experience once where our canoe flipped over and all our electronics were soaking in water for about 20 minutes. I didn’t want the same fate to happen to my beloved SLR. But pedal-boats are very heavy and sturdy, so chance of that happening again was slim. Once on the boat, and after a bit of bumper boats (think bumper cars but with boats), I started to look for subjects to shoot. The scenery was meh — sun was bright and high, no clouds, lots of reflections from the lake (no polarizer handy). Basically, a very low contrast, dull scene.

Then the windsurfers flew past us, and that got my camera’s attention. On land, they are too far to photograph, but out in the lake, they are practically right next to you. The perfect opportunity to try out some action shots!

So I had my camera set up for:

  • ISO 200 – the lowest it can go
  • f/2.8 – for some shallow depth of field, but not too shallow to make focusing easier
  • 1/3200s – turns out that’s the shutter speed I needed to get the correct exposure based on my aperture. More than enough to stop the action
  • Auto white balance – I shoot in raw, so WB not an issue

And that’s it. Exposure’s the easy part. Those settings never changed for the entire shoot. In retrospect, I might’ve used a longer telephoto, like the 100mm or 135mm Series E. The background just wasn’t blurred enough for my taste. But at f/2.8, the 50mm is sharper than my telephotos wide open, so I can’t complain there.

In the technical aspects of photography, my weakest point has always been focusing. It takes me several seconds before I am satisfied with the focus, and people always get impatient with me for that reason (which is why I hate doing portraits). So imagine having to focus manually with a high speed subject. It was quite the adrenaline rush.

We pedaled to a certain spot and waited for the windsurfers to come to us. Many were gracious enough to pose for me as they flew by, which was great. I panned on each subject, adjusting focus until the confirmation dot lights up. Then I fire away, holding down that shutter as long as it can go, accounting for focus as necessary. Spray n’ pray…

You can see how fast the shutter count racks up when using this technique. Not very elegant and not much thought on composition, but if it gets the shot, that’s good enough for me. Well, going through post-processing, I found a prevalent error on most of the shots — I was back focusing. Hmm, a number of possibilities could’ve happened:

  1. The AF confirmation dot was fooled into locking on to the background instead of the subject.
  2. My manual focusing is too slow, so by the time I dialed in the focus ring, the subject distance had already changed.

Not sure which issue it is — could be a combination of both. Anyway, out of the 90 or so shots I took, only 3 were usable. Ouch. That’s about a 3% keep rate, pretty bad even for my standards. Nevertheless, it’s better than having no pictures at all! All in all, it was a lot of fun. Shooting action and sports is very different than landscapes and nature photography, but it’s also very exciting. It’s definitely an ride I want to go on again!

The Quest for A Monopod

June 12th, 2008

300mm f/4.5 Nikkor-H with TC-200

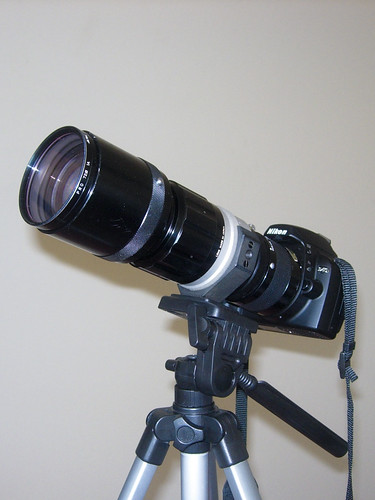
That 300mm f/4.5 Nikkor-H is a monster. The lens itself is 2.42 lb (1.1 kg) plus my D40 at 1.05 lb (475 kg) for a total of 3.47 lb. Add a TC-200 2X teleconverter on it, and we’re talking about a 4 lb camera lens combo. Handholding that combo is definitely not recommended. Even without the teleconverter, the lens is so heavy that the frame in the viewfinder is jumping up and down from the lack of stability. There goes any chance of composition.

So, when it comes to stability, there’s no question that tripods are the way to go. But I don’t have that kind of money to blow on a tripod, so my wimpy $7 tripod will have to do for now. But even though price is the main deciding factor, convenience is also important. I don’t want to have to setup a tripod everywhere I go. Also, in certain places with space constraints, a tripod might not even be feasible. So, I’m thinking a monopod might be a good balance between stability and convenience. (Eventually, I will get a tripod. But that’ll be a story for another time.)

Criteria (in descending order of importance)

  • <$100 – including both legs & head (if needed). Of course, the cheaper the better.
  • 10 lb load capacity or higher – in case I upgrade my gear in the future. (A D3 & 200-400mm VR, perhaps? I wish.)
  • light weight – The camera’s heavy enough. I don’t need more weight.
  • short folded length – easier for packing & traveling

Legs

The general concensus seems to be that monopod legs isn’t that big a deal. As long as it’s strong enough to prop up your gear, that’s all you need. Unlike a tripod, the monopod’s job is not to give you rock solid stability–it’s to provide you more mobility by relieving you of the heavy weight. So given the above criteria, I’ve narrowed it down to these options. They’re all good legs–just need to pick the right one for myself.

Name Sections Max Height Folded Length Max Load Weight Price
Bogen/Manfrotto 676B 4 60.6″ (154 cm) 18.9″ (48 cm) 10 lb (4.5 kg) 14.1 oz (400 g) $35 @ B&H
Bogen/Manfrotto 679B 3 63.8″ (162 cm) 25.2″ (64 cm) 22 lb (10 kg) 1.3 lb (0.6 kg) $45 @ B&H
Bogen/Manfrotto 681B 3 63.4″ (161 cm) 26.4″ (67 cm) 26.4 lb (12 kg) 1.7 lb (0.77 kg) $55 @ B&H
Canon Monopod 100 w/mini-ballhead 4 64.5″ (164 cm) 21.3″ (54 cm) 4.4 lb (2 kg) 1.1 lb (500 g) $32 @ Amazon
Feisol CM1401 4 64.17″ (163 cm) 20.87″ (53 cm) 15.43 lb (7 kg) 0.79 lb (360 g) $85 @ Feisol.net

Bogen/Manfrotto 676B
It’s very light in weight, and has a very compact folded length, but it’s only got the the minimum load capacity I was looking for. It’s definitely enough for my heaviest gear now, but not sure how much more gear I may buy in the future (They say NAS is a incurable). Still a great lightweight option, but for $10 more, I can get a huge increase in load capacity at the cost of some extra weight.

Bogen/Manfrotto 679B
This is the one I’m very seriously considering. It’s got excellent load capacity–more than enough for my lifetime, at least. All the other specs are right in between the 676B and 681B. In my opinion, it’s a very nice compromise between it’s bigger brother (681B) and younger brother (676B).

Bogen/Manfrotto 681B
This is the other leg I really like. It’s the big brother, and to me, seems like the only monopod you’ll ever need. It’s got the maximum load capacity that Manfrotto makes for monopods, and you don’t need to spend a fortune to get it (unlike the Gitzo’s). It isn’t very light, and it isn’t very compact, but I think I can live with that. And if $55 can buy me a monopod for life, that doesn’t seem so expensive.

Canon Monopod 100 w/mini-ballhead
I toss this on the list because of 2 reasons: it’s dirt cheap, and it has a built-in ball head. However, it doesn’t meet my load capacity requirement– 4.4 lb is just barely meeting my current load, and it won’t be usable at all if I were to upgrade any equipment. The built-in ball head is nice to have, but sometimes a ball head may not be the best choice. I’d rather have separate legs and choose what head I want to put on it, if any. Third, it doesn’t come in black. Call my vain, but I like to keep my Nikon color scheme.

Feisol CM1401
Amazingly light weight, since it’s the only carbon fiber monopod on the list. Decent load capacity as well. Feisol is a Taiwanese company that offers support equipment with quality very similar to Gitzo. Reviews seems to be very favorable, and price is still much more affordable than Gitzo. But for me, it’s still a bit steep, especially with shipping being an additional $24 because it’s coming from Taiwan.

Other considerations
Of course, you can’t beat a Gitzo. But you definitely have to pay for it. If you got $300 to burn, by all means, go for the GM3550 or 5540 and never look back. No one has ever regretted buying a Gitzo. Ever. Manfrotto also offers another excellent option. The 685B Neo Tec monopod has a very unique design that allows you to adjust the height almost instantaneously. At $145, it’s cheaper than the Gitzo, but a bit more expensive than the standard designs. Still a good option if it is within your price range. It’s just not within mine.

Head

A lot of monopods users directly mount their lens on the pod, with no head at all. Depending on your shooting needs, that can be perfectly fine. Simply moving the camera left and right allows you to pan. Moving up and down is a bit more awkward, and to a certain extent it can be done with the monopod directly attached. However, in situations where up & down camera movement is frequent, such as bird photography, a head attachment can be very beneficial.

Name Max Load Height Weight Price
Bogen/Manfrotto 3232 Swivel-Tilt Head 5.5 lb (2.5 kg) 2.4″ (6.1 cm) 9.5 oz (0.27 kg) $20 @ Amazon
Bogen/Manfrotto 3229 (234RC) Swivel-Tilt Head w/ Quick Release 6 lbs (2.7kg) 2.4″ (6.1cm) 9.5 oz (270g) $34 @ Amazon
Bogen-Manfrotto 484RC2 Mini Ball Head with Rapid Connect 2 (Quick Release) 8.80 lb (4 kg) 3.75″ (9.5 cm) 11 oz (317 g) $60@ Amazon

Bogen/Manfrotto 3232 Swivel-Tilt Head
A simple, lightweight head that offers vertical mobility for a very inexpensive price. For $20, it doesn’t get any cheaper than that.

Bogen/Manfrotto 3229 Swivel-Tilt Head w/ Quick Release
Basically the same as the 3232 except for an important upgrade: the RC2 quick release system. This can be very convenient if you attach and detach the monopod leg from the camera pretty often. To me, the small price increase is worth the extra convenience.

Bogen/Manfrotto 484RC2 Mini Ball Head
The next step up is actually a tripod ball head, but can be used on a monopod too. There are certain benefits for using a full ball head on a monopod, such as the ability to easily position the camera in any orientation. The other advantage is the possibility of reusing the same head on a tripod and monopod, thereby reducing the cost of having to buy 2 heads. However, the extra mobility of a ball head can work against you sometimes when a heavy lens is attached.

Other considerations
Of course, you can use any model of ball heads out there, from budget models to very expensive tripod heads from Markin, Kirk, Really Right Stuff, etc. RRS also has a clamp & release system attachable to the 3232 to allow compatibility with the more common Arca Swiss type release plates. If you are already invested in that standard (L plates, Wimberley, etc.), this option allows you to use a swivel-tilt head with the quick release plates you already have.

Conclusion

Given my criteria and the type of shooting I plan to do with the setup, my final choice is basically between 2 these two combinations:

  • Bogen/Manfrotto 679B w/ 3229 Swivel-Tilt head – $79 @ B&H
  • Bogen/Manfrotto 681B w/ 3229 Swivel-Tilt head – $89 @ B&H

In my opinion, the quick release clamp on the 3229 head is worth the premium over the standard screw on mount on the 3232. I’ve heard good things about Manfrotto’s RC2 quick release system, so I don’t feel that I’ll be locking myself exclusively into it by buying this head. My future tripod head purchase may very well be one of the Manfrotto RC2 models.

As for the legs, the choice a little harder. The 679B definitely provides enough load capacity for me. As a result of a lower max load, it is also a little more compact and lighter than the 681B. On the other hand, the extra load capacity of the 681B gives me a warm fuzzy feeling that this leg is the be all, end all of legs for me. For $10 more, that extra security looks pretty attractive.

Bottom line is, you can’t go wrong with either combo. They are all excellent options.

A small word on macro

May 26th, 2008

“A small word”. “Macro”. Get it? Ok, bad jokes aside, the title is accurate because here is that small word to describe macro: hard.

Having purchased a dedicated manual focus macro lens for my D40, I am still trying to take a decent macro shot with it. I’ve seen heard countless praises for the sharpness and image quality the 55mm f3.5 Micro-Nikkor Pre-AI lens is known to produce. And I’ve seen plenty of great images on Flickr that are proof of this. And yet, after hundreds of shots, I still can’t get that perfect macro shot?

Do I have a defective lens? Probably not. Like most photography problems, the first response is to blame the equipment. But most of the time, the actual culprit is the person behind the camera. But before I’m proven guilty, I’d like to at least give some clarifications regarding the obstacles of macro we all had to face. It’s no excuse for sloppy photography, but perhaps, it may warrant some sympathy?

  1. Manual focusing – This is one of those times where I wish my D40 had a split-prism focusing screen like the Katz-Eye. Manual focus is hard enough under normal circumstances, but when you’re trying to focus on a small insect buzzing around a flower at 1:2 magnification, that’s a whole different level of manual focusing. From what I’ve heard, macro photographers still need to manual focus on their autofocus lenses, so I’m not sure if continuous autofoucs technology will help much here. I don’t trust my eyes too much, so I depend a lot of the focus confirmation dot in the viewfinder. But the shallow depth of field due to the close subject distance causes that focus confirmation to be blinking constantly, and never locking on. So in the end, I just wing it, and focus bracket slightly by taking continuous shots with very slight adjustments on the focus ring. Spray n’ pray, so to speak.
  2. Depth of field – As I mentioned before, the close subject distance causes that depth of field to be thinner than a slice of prosciutto di parma (good stuff, by the way). The slightest hand movements can cause the subject to be out of focus. A tripod would definitely help here, but my $6 crappy tripod causes more shake than it helps to stabilize. A depth of field preview button would’ve been useful as well, so at least I’d know what’s in-focus in the frame. Forget about composition, I’m just trying get the subject in-foucs here!
  3. Exposure – To counteract that extreme depth of field, this means stopping down the aperture. We’re talking f16 or higher here if you want most of your subject in focus. But if that subject is also moving, we’re going to need a high shutter speed as well. At the minimum, I always follow the 1/focal length rule for hand-holding shutter speeds. (On digital, because of the cropped sensor, the new rule seems to be 1/ 2x focal length. With my shaky hands, I tend to follow this as much as I can.) With a small aperture, and fast (enough) shutter, something’s gotta give — time to jack up that ISO. In broad daylight, I find myself having to shoot in ISO 800 or even 1600. Nosie or no noise, better to get the image or not at all, right?
  4. Weather – WInd blows. No seriously, wind is the enemy of macro. Most of my time, I’m patiently standing or kneeling, waiting for the wind to die down so I can focus on my subject. By the time I got a decent focus, the wind picks up and I lose the shot. Back to waiting again. This is why it takes me a few hours of being in a single spot just to get a couple of decent shots.

Given those difficulties, my keep rate for macro is definitely pretty low. We’re talking about 4 decent shots out of a 100. Decent shots — nothing spectacular.

With that said, I got a bit of luck today with this little fella above. He was perfectly still the whole time, so I was able to lower my shutter to around 1/60 (lower than the suggested guidline, but you gotta do what you gotta do). Still had to shoot at ISO 800 or above to get the shot with f16 aperture on a overcast day. Wind was somewhat of a problem, but fortunately, there were moments of calm. Took about 30 shots of this guy, and this was the best of the bunch. In post-process, bumped up the contrast, sharpened a bit, and added a bit of vibrance and clarity to add some punch to the image. Getting better slowly, I guess…

50mm f1.8 Series E – A test shot

May 24th, 2008

Villa Montalvo

I had a chance today to try out the newly acquired Nikon 50mm f1.8 Series E lens on my D40. Having already owned 2 other 50mm’s, I was hesitant to buy yet another 50. But I’ve been impressed with the Series E lenses so far, and getting this lenses draws me that much closer to completing the collection. And for $20 shipped, it was pretty much a no-brainer.

Villa Montalvo is a lovely place in Los Gatos where many people hold their wedding ceremonies and receptions. I was able to take a few shots with this lens before the rain started to come down (unusual for this time of year). Although I didn’t get to take as many photos as I would like, this particular one is a pretty good example of the len’s capabilities.

First, a few technicals: D40 camera set at f4, 1/250, ISO 200, Auto White Balance. I was pretty happy with the composition off the camera, so no cropping was done. Other post-processing included increased exposure by a stop, added a bit of saturation, and a tad of sharpening all using Lightroom. The processed image doesn’t look a whole lot different other than the exposure setting. (I’m still working on my manual metering skills, but shooting in raw helps gives me some lattitude in post-process to correct it)

As for the performance of the lens, I’m happy with it so far. It’s incredibly compact– the most compact and lightweight 50mm I own. It can almost be considered a “pancake” lens. The build is metal & plastic, and although it was blasted for its plastic material back in the early 80’s, the quality is still much better durable than the kit lens. The aperture ring was easy to use and clicks fully on every stop without much effort. Focus is very smooth, with enough turning angle to allow precise manual focusing. (Manually focusing on that single strand of grass was still a pain because the wind was blowing. Focus confirmation would not lock on at all, so I had to take several shots by eye only. Of course, autofocus wouldn’t have done much better in these conditions anyway. It would’ve locked on the sculpture behind, which was not my intention at all)

Bokeh looked pretty smooth to me for f4.0. I would’ve preferred the background to be even blurrier–I’ll try some different apertures next time. In the future, I’d like to test this lens out in other lighting conditions and see how it performs, but I have no doubt that it’ll be just as good.

A tribute to the 50’s

May 23rd, 2008

350

Just like to start out with a special little something for all the 50mm’s out there. The 50mm was the “normal” lens back in the film days, and are still regarded as one of the best values today, no matter which camp you’re in (Canon, Nikon, Pentax, etc.) I’ve seen Canon’s 50mm f1.8 Mk II go for $70 on amazon.com pretty often. With L glass going into 4 digit pricing easily, you can’t beat that price anywhere… Well, except when it comes manual focus lenses.

As I began my journey into DSLRs and photography, I never expected to get into “old” technology. Here I am with the latest and greatest camera, fully equipped with a very decent kit lens and a even better telephoto. VR, ED, IF, AF-S and all that jazz. What more could one possibly want? But after a few uses, it became apparent there were indeed limitations in the kit lens, especially in low light. Like many before me, I ventured into the never ending pursuit of faster glass.

What better value can anyone ask for than a 50mm f1.8 lens for under $100? Being a cheapskate at heart, I asked that question and discovered the answer: manual lenses. With autofocus everywhere in the market, one wouldn’t even know that manual lenses ever existed. But the decades of technology doesn’t just disappear into thin air–they end up on ebay. The manual version of the 50mm f1.8 can now be had for a fraction of the price of that already great value autofocus counterpart. This makes the manual 50mm an exceptional value. Check out the prices I paid for these 50’s.

  • Nikon 50mm f1.8 Series E (made in ~1983) – $20
  • Nikon 50mm f2.0 Nikkor-H (made in ~1969) – $32
  • Nikon 50mm f1.4 Nikkor-S (made in ~1971) – $37

Autofocus technology does have its advantages, but the optical formula has not changed all that much for the 50mm primes over the years. Image quality is just as good as any autofocus today. In addition, manuals have the benefit of a better dampened focus ring, superior all-metal build quality, and above all… they are dirt cheap. Long live the old 50’s.